
Effective product photography can dramatically influence a customer’s perception and drive sales, making the art of propping up products an essential skill for photographers. Properly chosen and positioned props not only enhance the visual appeal of a product but also contextualise it, helping potential buyers envision the product in their own lives.
In this guide, we will delve into how to select the right props, arrange them to highlight the product’s best features, and capture images that are both striking and informative.
Prop Basics for Product Photography
The props should enhance the product, relate to its use or target audience, and not distract from the main focus. Start by fully understanding the product you’re photographing. What is its purpose? Who is the target audience? Answering these questions can guide you in choosing props that resonate with potential customers.
Prop Selection
- Relevance: Select props that complement the product’s use or the lifestyle of its target audience. For example, if you’re photographing kitchen knives, pairing them with ingredients suggests their use in cooking.
- Scale and Size: Choose props that are proportionate to the product. Oversized props can dwarf the product, while tiny props might get lost in the scene.
- Color and Texture: Use colors and textures that complement the product and enhance its features. Avoid overly bright colors or busy patterns that might draw attention away from the product.
- Minimalism: Sometimes less is more. A single, well-chosen prop can be more effective than several that clutter the scene.
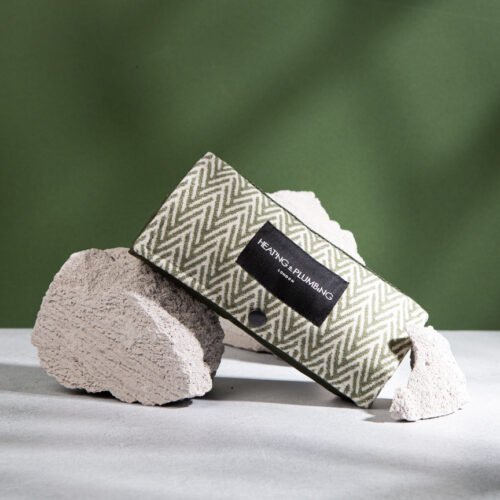
Examples of Versatile Props
- Textiles: Simple fabrics can add texture and depth to your product shots. A linen napkin or a textured scarf can serve as a soft background for small items.
- Natural Elements: Items like wood, leaves, stones, or water can introduce a natural and fresh feel, ideal for organic or outdoor products.
- Kitchen Items: For gourmet products, kitchen utensils, herbs, and raw ingredients can create a culinary scene that appeals to food enthusiasts.
- Office Supplies: For tech gadgets or office products, minimalist office supplies like notepads, pens, or glasses can suggest a workspace environment.
Selecting the right props is about enhancing the story your product tells. By thoughtfully integrating relevant props, you can create a compelling narrative that captures the essence of the product and appeals to your target audience.
Arranging Your Scene
Once you’ve selected the appropriate props, the next step is to effectively arrange them to showcase the product’s best features. Here’s how to create a well-composed scene that captures attention and communicates value:
Plan Your Layout
- Sketch It Out: Before setting up, sketch a rough layout of how you want the scene to look. Consider the product as the central element and arrange props around it to enhance its story.
- Focus on Balance: Ensure that the composition is balanced. Props should support the product rather than overshadow it. Play with asymmetry or symmetry based on the mood you want to evoke.
Set Up the Product
- Positioning: Place the product strategically within the frame where it naturally draws the eye. Use the rule of thirds for an engaging composition.
- Angle and Perspective: Consider the angle that best highlights the product’s features. Shooting from above can work well for a more graphic, flat-lay style, while shooting at eye level can be better for products like bottles or electronics.
Arrange the Props
- Support the Product: Arrange props in a way that leads the viewer’s eye towards the product. Use leading lines and arrange smaller props toward the front and larger ones in the back to create depth.
- Create Context: Props should tell a story about the product. For instance, placing a coffee mug next to a French press on a tray suggests a morning routine.
Check and Adjust
- Review the Composition: Take a test shot and review it. Look for any distractions or empty spaces that might detract from the product. Adjust the props and product placement as needed.
- Lighting Check: Ensure that the lighting complements the scene. It should highlight the product’s features and create the right mood without causing harsh shadows or overexposure.
Optimal Lighting and Backgrounds
Lighting and background choices should complement the product and props without overshadowing them. Here’s how to make decisions about lighting setups and backgrounds:
Lighting Techniques
- Soft Lighting: To avoid harsh shadows and highlight the texture of the product, use soft, diffused lighting. This can be achieved with natural light near a window or softboxes that mimic daylight.
- Directional Light: Use directional lighting to create depth and accentuate the shapes of the product. Side lighting, for example, can enhance texture and details.
- Backlighting: This technique can help to outline the product, making it stand out against the background. It’s particularly effective for transparent or semi-transparent products.
Choosing the Right Background
- Neutral Backgrounds: Stick with simple, neutral backgrounds that do not distract from the product. White, gray, or pastel tones are versatile and make the product pop.
- Contextual Backgrounds: If the product’s use is specific to a certain environment, a contextual background can add depth to the story. For example, placing outdoor gear on a backdrop of woods or mountains can enhance its appeal.
- DIY Backgrounds: Create custom backgrounds with materials like painted canvas, colored paper, or textured fabric. This allows flexibility and control over the aesthetic of your photos.
Integrating Background with Lighting
- Reflectors and Diffusers: Use reflectors to bounce light back onto the product and fill in unwanted shadows. Diffusers can soften the light when using harsher sources.
- Adjusting for Mood: The combination of background and lighting should align with the mood you’re trying to convey. Bright, airy lighting and backgrounds work well for products intended for outdoor use, while darker, moodier settings can be ideal for luxury items.

Camera Techniques for Propped Products
The way you handle your camera settings and choose your shooting angles can significantly influence the effectiveness of your product photography. Proper techniques ensure that the product and its features are clearly showcased, enhancing the overall visual appeal. Here’s how to optimize your camera use for propped product shots:
Camera Settings
- Focus: Always ensure the product is in sharp focus. Use a narrow aperture (higher f-stop number) to get more of the scene in focus, particularly useful in complex setups with multiple props.
- ISO: Keep the ISO as low as possible to minimize noise. Higher ISOs can be used in low light but be mindful of the grain it can introduce.
- Shutter Speed: Adjust the shutter speed according to the lighting and movement of the product. A faster shutter is essential if there’s any motion, such as in lifestyle shots with human interaction.
- White Balance: Set the white balance to match the lighting conditions to ensure the colors in your photo are accurate and consistent.
Choosing the Right Angles
- Eye-Level: This angle is great for products that are typically viewed at eye level in natural settings, like computer monitors or kitchen appliances. It gives a realistic view of the product.
- High Angle: Shooting from above can capture the entire layout of a scene, useful for showing all components of a product or set, like board games, jewelry layouts, or tech gadgets with multiple pieces.
- Low Angle: Use this for larger items or when you want to give the product a sense of grandeur. It’s effective for furniture or footwear, providing a dynamic perspective.
Techniques for Enhancing Visual Interest
- Depth of Field: Playing with depth of field can add dimension to your photographs. A shallow depth of field (wide aperture) can blur the background and focus sharply on the product, drawing the viewer’s eye directly to it.
- Leading Lines: Arrange props to create leading lines that draw attention toward the product. This can be done through the alignment of smaller items pointing towards the main product or using natural lines of a backdrop.
- Reflections and Shadows: Utilize reflections and shadows to add artistic elements to your photos. For instance, the use of glass or mirrors can create intriguing reflections that enhance the product’s appearance.
Mastering these camera techniques will allow you to take professional-quality photos that highlight your product’s best features while also creating a compelling visual narrative with your props. This combination of settings, angles, and creative photographic elements will ensure your product images are both appealing and effective in conveying the desired message to your audience.
In Closing
Effective product photography goes beyond simply taking pictures – it’s about crafting a scene that tells a story and showcases the product in its best light. By carefully selecting props, arranging them thoughtfully, mastering lighting and backgrounds, and fine-tuning your camera techniques, you can create images that not only look professional but also capture the essence of the products you’re photographing.
Now that you’ve learned the essentials of setting up a successful product photo shoot, it’s time to put your knowledge into practice. Experiment with different props, layouts, and lighting conditions to find what works best for your specific products.