
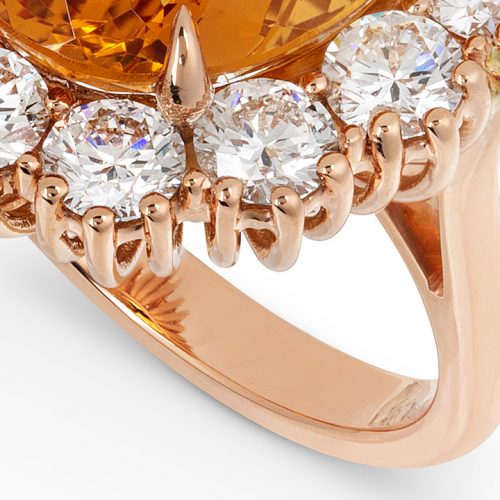
Capturing the sparkle of a diamond in a photograph isn’t easy—but with the right setup, it’s absolutely achievable. To make diamonds sparkle in photos, you need a combination of controlled lighting, precise angles, and a clean, detailed shooting environment. The key is to balance soft diffused light for clarity with small directional light sources that create highlights on the diamond’s facets.
Diamonds don’t naturally “sparkle” on camera the way they do in real life. Their brilliance comes from how light enters, reflects, and exits the stone—so your job as a jewellery photographer is to recreate those light conditions intentionally.
In this guide, you’ll learn exactly how to photograph diamonds so they look bright, sharp, and full of life. Whether you’re shooting jewellery for ecommerce, marketing campaigns, or high-end branding, these techniques will help you produce professional, eye-catching results.
Key Takeaways
- Use diffused lighting for clarity – Soft light reveals the diamond’s shape and reduces harsh reflections
- Add a small direct light source – This is what creates the visible sparkle and highlights
- Shoot with a macro lens – Capture fine details and facet reflections clearly
- Keep your aperture between f/8–f/11 – Ensures the entire piece is sharp and in focus
- Clean the diamond thoroughly – Dust and fingerprints will ruin sparkle instantly
- Experiment with angles – Slight changes in positioning dramatically affect how light interacts with the stone

How to Photograph Diamonds (Step-by-Step Setup)
Photographing diamonds successfully comes down to controlling light, precision, and patience. Because diamonds react so strongly to even small changes in lighting and positioning, a structured setup will help you achieve consistent, high-quality results.
1. Clean the Diamond Thoroughly
Even microscopic dust, fingerprints, or oils can significantly reduce sparkle and clarity in your photos. Use a lint-free cloth or gloves to handle the piece and check it under light before shooting. Clean jewellery is one of the simplest but most overlooked factors in achieving professional results.
2. Set Up Diffused Lighting
Start with a soft, even light source such as a lightbox or softbox. This creates a balanced base exposure and ensures the diamond’s overall shape and structure are clearly visible. Without this foundation, your image can look harsh or uneven.
3. Add a Small Direct Light Source
Introduce a focused light source (such as a small LED or controlled flash) aimed at the diamond. This is what creates the sparkle—light reflecting off the facets to produce highlights and “fire.” Without directional light, diamonds tend to look flat on camera.
4. Position and Angle the Diamond
This is where much of the magic happens. Slightly tilt or rotate the diamond and observe how the light interacts with its facets. Small adjustments can dramatically change the way sparkle appears, so take your time to find the strongest reflections.
5. Use a Tripod and Macro Lens
A tripod keeps your framing consistent and eliminates camera shake, which is especially important for close-up shots. A macro lens (typically 60–100mm) allows you to capture fine details and facet definition without distortion.
6. Adjust Settings and Fine-Tune
Take multiple shots while adjusting light position, intensity, and angle. Review your images as you go and refine your setup. Diamond photography often requires iteration, so don’t expect the perfect shot immediately—small refinements lead to the best results.
Best Lighting Setup for Diamond Photography
Lighting is the single most important factor in making diamonds sparkle in photos. Unlike many other products, diamonds rely entirely on how light enters and exits the stone. If the lighting isn’t controlled correctly, even a high-quality diamond can appear dull or lifeless.
Use Diffused Light for Base Illumination
Diffused light (from a softbox, light tent, or indirect natural light) creates an even, soft illumination that reveals the diamond’s overall shape and clarity. It reduces harsh shadows and ensures the jewellery looks clean and well-presented.
Why it matters:
- Reduces unwanted glare and harsh reflections
- Shows the full structure of the diamond
- Creates a balanced, professional base image
Add Directional Light for Sparkle
A small, focused light source is essential for creating sparkle. This light reflects off the diamond’s facets, producing bright highlights and the characteristic “fire” effect that makes diamonds visually appealing.
Position this light carefully—too strong or poorly placed lighting can cause overexposure or distracting reflections. Subtle adjustments often make a significant difference.
Best options:
- Small LED lights
- Controlled flash
- Focused spotlights
Combine Both for Best Results
The most effective diamond photography setups use a combination of diffused and directional lighting. Diffused light provides clarity and consistency, while directional light adds brilliance and sparkle.
Think of it as a balance:
- Diffused light = foundation and detail
- Directional light = highlights and visual impact
When these two elements are working together, the diamond will appear bright, dimensional, and full of life—closer to how it looks in real-world lighting conditions.
Best Camera Settings for Diamond Photos
Getting the right camera settings is essential for capturing the detail and brilliance of diamond jewellery. Because diamonds are small, reflective, and highly detailed, your settings need to prioritise sharpness, clarity, and accurate exposure.
Aperture (f/8 – f/11 for Sharpness)
A mid-to-narrow aperture ensures that the entire piece of jewellery stays in focus, especially when shooting close-up. Wider apertures can create blur that reduces the visibility of facets and sparkle.
ISO (Keep It Low)
Use a low ISO (typically 100–200) to minimise noise and maintain clean, high-quality images. Since you’re working with controlled lighting, there’s no need to increase ISO.
Shutter Speed (Adjust to Lighting)
Shutter speed should be adjusted based on your lighting setup. Because you’re using a tripod, you can afford slower shutter speeds to ensure proper exposure without introducing blur.
Focus (Manual for Precision)
Manual focus is highly recommended for diamond photography. Autofocus can struggle with reflective surfaces, so manually focusing on the key facets ensures maximum sharpness where it matters most.

Choosing the Right Lens for Diamond Photography
The lens you choose has a significant impact on how your diamond appears in the final image.
Macro Lenses for Detail
A macro lens (typically between 60mm and 105mm) is ideal for jewellery photography. It allows you to capture intricate details and facet reflections without distortion.
Avoid Wide-Angle Lenses
Wide lenses can distort the shape of jewellery and make diamonds appear unnatural. For commercial and ecommerce photography, maintaining accurate proportions is essential.
Working Distance Matters
Longer focal lengths give you more space between the camera and the subject, making it easier to control lighting and avoid unwanted shadows or reflections.
Background and Composition Tips
The background and composition play a key role in how the diamond is perceived. A well-chosen setup can enhance sparkle, while a poor one can distract from it.
Keep Backgrounds Simple
Neutral backgrounds such as white, black, or soft grey work best. They allow the diamond to remain the focal point and prevent visual clutter.
Use Reflective Surfaces Carefully
Glossy black acrylic or mirrors can add depth and sophistication. However, reflections should be controlled to avoid distracting from the product.
Focus on the Diamond as the Hero
Your composition should always guide the viewer’s eye toward the diamond. Use framing, spacing, and positioning to ensure it remains the centre of attention.

Post-Production Tips to Enhance Diamond Sparkle
Post-production should enhance what you’ve already captured—not replace it. A well-shot image requires only subtle adjustments to bring out its full potential.
Adjust Brightness and Contrast
Increasing contrast slightly can help the diamond stand out and emphasise highlights.
Enhance Clarity and Sharpness
Careful sharpening can bring out facet detail, but avoid over-processing which can make the image look unnatural.
Fine-Tune Colour and White Balance
Ensure the diamond appears clean and true to life. Remove unwanted colour casts for a more premium look.
Retouch with Precision
Use retouching tools to remove dust, scratches, or imperfections. Keep edits subtle to maintain authenticity.
Common Problems in Diamond Photography (And How to Fix Them)
Even with a good setup, diamond photography comes with challenges. Understanding these issues will help you troubleshoot and improve your results quickly.
Diamonds Look Dull (No Sparkle)
Cause: Lack of directional light
Fix: Add a small, focused light source and adjust the angle until highlights appear
Too Many Reflections or Glare
Cause: Uncontrolled lighting or reflective surroundings
Fix: Use diffused lighting and reposition light sources; consider a polarising filter
Diamond Looks Flat
Cause: Lighting is too even with no contrast
Fix: Introduce side or directional lighting to create depth
Blurry or Soft Images
Cause: Focus issues or camera movement
Fix: Use manual focus, a tripod, and check focus on key details
Colour Looks Off
Cause: Incorrect white balance
Fix: Adjust white balance in-camera or during post-production

Pro Tips for Better Diamond Jewellery Photography
- Always clean the jewellery before shooting
- Work slowly and adjust lighting in small increments
- Test multiple angles to find the best reflections
- Keep your setup controlled and consistent
- Use props sparingly to avoid distractions
Diamond photography rewards patience and precision—small improvements in setup can lead to significantly better results.
Capture Professional Diamond Jewellery Photography with Kalory Photo Studio
Photographing diamonds to a high standard requires experience, technical skill, and a controlled studio environment. If you want your jewellery to truly stand out, working with professionals can save time and deliver consistently high-quality results.
At Kalory Photo Studio, we specialise in capturing the brilliance of jewellery through expert lighting, styling, and post-production. Whether you need clean ecommerce images or high-end campaign visuals, our team ensures your products look their absolute best.
Get in touch today to elevate your jewellery photography and showcase your products with maximum impact.
FAQs About Diamond Photography
How do you make diamonds sparkle in photos?
To make diamonds sparkle in photos, use a combination of diffused lighting and a small directional light source. Diffused light provides overall clarity, while direct light creates highlights by reflecting off the diamond’s facets. Adjusting the angle of both the diamond and the light is key to achieving strong sparkle.
What lighting is best for diamond photography?
The best lighting setup combines soft, diffused light (such as a lightbox or softbox) with a focused light source like a small LED or controlled flash. This balance helps reveal the diamond’s structure while creating the bright highlights that produce sparkle.
What camera settings are best for photographing diamonds?
Use an aperture between f/8 and f/11 for sharpness, keep ISO low (100–200) to reduce noise, and adjust shutter speed based on your lighting. Manual focus is recommended to ensure the diamond’s facets are captured in detail.
What lens is best for diamond photography?
A macro lens between 60mm and 105mm is ideal for diamond photography. It allows you to capture fine details and reflections clearly while maintaining natural proportions.
Why don’t diamonds sparkle in photos?
Diamonds often look dull in photos because they rely on specific lighting conditions to sparkle. Without directional light hitting the facets at the right angle, the reflections that create sparkle won’t appear.
Can you take good diamond photos with a phone camera?
Yes, but it can be challenging. Use good lighting, stabilise your phone, and shoot close-up if possible. However, for professional-quality results, a camera with manual controls and a macro lens will deliver much better detail and sparkle.